A Color Blanks Ladybug Out for a Summer Drive
Creating art with Color Blanks is a lot of fun. I started collecting Color Blanks a couple years back when I found them in my local arts and crafts store. In addition to creating many other types of art I enjoy sculpting and creating figures. Modifying Color Blanks gives me the opportunity to create some of my favorite characters without the time and expense that other artistic media requires.
Free PDF download
For your convenience you can download the below Ladybug Color Blanks Tutorial as a printable PDF guide to aid you in creating your own custom Color Blanks.
Download – Color Blanks Tutorial (PDF) – 1.68mb
For this ladybug Color Blanks figure I went with the vehicle set. It comes with a little car, a figure, some stickers, and four pens. The little white car and the figure offer a great palette to let your imagination go wild. The Color Blanks package suggests ideas such as a racing theme but I had something very different in mind. This is the great thing about these little vinyl figures; that you can create virtually anything you want with them. The sky’s the limit!

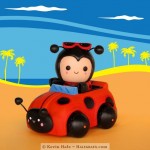
Color Blanks Ladybug figure at the beach!

Color Blanks Vehicle Set
Step 1: Plan your Color Blanks Figure
I started by creating a sketch of the figure that I wanted to have. The figure set comes with a paper that you can sketch your ideas on or you can download printable templates from colorblanks.com and create a plan for your figures with those. I’ve been drawing all my life and prefer to draw my ideas in a sketch book. When I was all done with my sketch I created a little ladybug and a ladybug car. Two very significant changes I made to the figures were changing the car into a convertible and the ladybug had a different shape head than the color blank.

Color Blanks ladybug sketch
Step 2: Disassemble and modify pieces
Once I started working with the figure I disassembled its pieces, which always makes painting, modifying, and adding clay easier. I then needed to make necessary cuts to the figure or in this case to the car. I cut the roof off the car and basically turned the windshield into a small windshield that the Color Blank could see over. This also seemed more functional to me as I could stick my figure in the car. After the rough cuts with an X-Acto knife, I sanded the edges. The vinyl holds up well to sanding with any desired grain sandpaper.

Disassembling and modifying Color Blanks
Step 3: Base Color Painting
The next thing that I did was paint any items I could with a base coat of the final color that they would have. Even though the head wasn’t properly sculpted yet it was much easier to have a coating of the skin color underneath the sculpted area to save time on detail painting. Also getting the car and various body parts colored so that they could dry while I sculpted saved me a lot of time!

Starting to paint base coats on the Color Blanks
Step 4: Sculpt Polymer Clay Modifications
I took polymer clay to sculpt modifications to the tires making them round instead of marshmallow shaped. I used craft wire to create antennas for the ladybug and car. The tricky part here is the pieces have to be baked and the vinyl does not hold up to the heat really well. Polymer Clay recommends being baked at 275° but you will end up with severely warped figures if you do that. I usually bake my figures at about 240° or just the necessary pieces for a slightly longer period of time.

Adding Polymer clay to Color Blanks
Step 5: Assemble, Touch-up and Photograph!
After all the pieces were baked and assembled I did some final paint touchups and photographed my ladybug on some colored card stock. I did some post work in Adobe Photoshop and Illustrator to add in a beach scene. Now this little ladybug Color Blanks figure is ready to cruise by the beach!

Color Blanks Ladybug figure at the beach!

No Responses