Halloween Zombie Color Blanks Figure
Halloween is one of my favorite holidays and I was really looking forward to making more Halloween Color Blanks figures! For this particular Halloween I decided to do a zombie Color Blanks figure. I looked through my collection of unfinished figures available and I had this cool egg figure. I thought that it would work great to create a zombie figure. Also, recently while I was at the craft store I stumbled across these cool little wooden coffins that looked about the right size for my figure.

Zombie Color Blanks Figure
Step One: Creating a Plan for the Color Blanks Figure
The first thing I did was get a mockup of how wanted the figure to look. In this particular case what I did was pose the figure in the coffin and then take a photograph so I would have an idea of how it would stand and how I would sculpt it more as a composition.

Egg Head Color Blanks Figure in Coffin
Step Two: Disassembling and Modifying the Figure
As I do with all my figures, one of the earliest things I did in the creation process is take the figure apart and then start making any necessary cuts on the figure. For my zombie Color Blank I wanted to have the eyes glow so I needed to make holes in the eyes to see lights through. This also complimented the sculpting process because I wanted to have some decay and have it look somewhat skeletonized.

Taking Apart the Color Blanks Figure
I cut the nose hole and eye holes and I also cut out a part of the head where it would have the brain exposed. Doing this also gave me a good area to work inside the head where I would be feeding wires for LED glowing eyes.
Step Three: Polymer Clay Sculpting
Sculpting is always my favorite part of modifying the Color Blanks figures. I really had fun sculpting clay onto the face to make my decaying zombie. I added little black pieces that were fitted into the eye and nose cavity. There were small holes made in the eye pieces to connect the lights.
Sculpting the brain that would be exposed out of the broken part of the skull was definitely a tricky part. The brain had to be sculpted larger than the hole and while the clay was soft I bent and place it inside the head. I then fit it to the location of the opening of the skull as if I was patching it closed. Next I released it from the side of the head and left it free floating when I gave the head a baking in the oven. This way I still had room to work with wiring and then glue the brain up fitted when completing the figure.

sculpting polymer clay on the zombie color blanks figure
Step Four: Paint Base Coating
After items had been cut, reassembled and put back together, it was time to give the zombie a base coating of acrylic paint. The zombie was coated in greens and blues.

Zombie Color Blanks Base Coating
Step Five: Detail Painting and Sculpting of the Hair
I made and attached simple strands of black polymer clay hair after I finished up detail painting highlights and shadows with various acrylics. For the coffin I painted brown and gray acrylic paint and then poured on rubbing alcohol to the still wet paint. This can create various aging and cracking effects in the paint depending on the ratio. It helped to give more of an aged looked to the coffin. The alcohol itself evaporates away. One of the zombie’s arms was cut in half and then a piece of wire and hot glue was added to create bone tissue. For the rotting chest area, I cut a hole in the chest and used hot glue to make exposed ribs.

Zombie Color Blanks Details
Step Six: Wiring Up the LED lights in the Color Blanks Figure
I added a rocker switch to the back of the coffin, added a connector for a 9V battery and some wires to go up to connect the LEDs inside the head. I then assembled the Color Blank Zombie figure back together. The battery was housed inside the coffin. If you are not much for wiring RoseArt has new illuminated Color Blanks figures that come with LEDs that make them glow!

Wiring for Zombie Color Blanks Figure
Finishing Touches
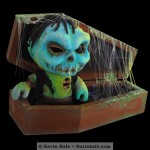
Once the figure was completed, the LEDs were tested and then I took a hot glue gun and started making strands of webbing all over of the coffin. An easy way to do this is to add globs of hot glue to an area and let it cool for a few seconds and then take the glue gun and touch the glue. The glue will stick and allow you to stretch it down to another area. Repeating this process the hot glue will be stringy and will stretch out to create web-like strings. Thanks for taking a look!

Zombie Color Blanks Figure

No Responses